Category Archives: I made it
>Every Purse Needs A Wallet
>


Can I mention again that I love it?! I really do! It’s cute and fun and playful and so me! The only problem is that it is little and my wallet is, well, not. This has never been an issue for this huge-diaper-bag-toting momma, but cute-purse-carrying momma needs a new wallet.

I had some fusible interfacing leftover from making the placemat and some fabric leftover from making the purse. I had a few weeks sewing experience and a general idea of what a simple wallet might look like. And I had 30 minutes to kill, so what the hey!
I don’t carry a lot with me, so I didn’t need anything huge. I needed something small enough for the purse, but large enough to hold my zoo member card, my DL, my debit card, and my insurance card (in order of importance of course – yay zoo!). I also wanted to be able to hold a little bit of cash for when I don’t feel like taking the entire envelope system shopping with me (Hi Dave!).
I spent a little time the other day mapping out what I would need to do. I made a sample out of paper so that I could work it out instead of trying to see it in my head. The paper was (of course) 8.5×11 inches, so that’s what we’re going to start with in fabric! See how I dumb things down for myself?
Supplies Needed:
9.5″x11″ fabric
slightly smaller fusible interfacing (I had about an inch on each side, but this isn’t necessary)
coordinating thread
The first thing I did was to iron on my fusible interfacing. Just place it in the center of your fabric, cover with a spare cloth (or fabric for your next project, whatever is lying around), and iron. I set the iron down for 10 seconds, lift up and repeat in a different spot until I have covered the whole piece. Then I iron it like normal on both sides. I’m not entirely sure this is “correct” but I can say that it works!


The next thing I did was to make my creases and press them in place. The whole wallet, when complete, will be 3″ high.

After you get the basic shape pressed, top stitch across what will be become your pockets.

Now fold your wallet in on itself so that the pockets are on the inside and you see a solid piece of fabric. Run Stitch down the raw edges, with a 1/4″ (ish) seam allowance.

Flip your wallet inside out and you now have the basic shape! Congratulations! Of course, I wouldn’t put any money in the middle there… it might fall out the bottom!

The last step is to fold up the loose raw edge on the bottom. You want to fold this into the middle money pocket we created. Press in place. Now top stitch around the bottom and two sides and you’re done! YAY!


I hope you enjoyed my first sewing tutorial! I apologize for the lack of pictures as I went through, but I was making it up as I went and didn’t think to take any! If anyone decides to make a wallet using my tutorial, please let me know! Either leave me a comment or send me an e-mail at anestinthemaking {at} gmail {dot} com! I’d *LOVE* to see it!
>Child’s Out-To-Eat Placemat
>Hello everyone and happy hump day! I hope y’all are all having a great week!
This evening I finally finished off my second mother’s day project! Mother’s day in that I bought the fabric with mother’s day gift money, not actually mother related at all… but I digress.

Introducing: My first creation for my son, a placemat for when we go out to eat!

I’ve been itching to make something for the little man for a while now and I’m excited with how well this came out. There were a lot of lessons on the way (did you know bias tape is smaller on one side than the other? You probably did, but I did not), but I am thrilled with the end result. I can’t wait until Sunday when we go out to lunch after church so it can make its debut!

I used 2 fabrics from the Circus by L’Miss collection. The pocket fabric came from the remnants bin. The inspiration and tutorial came from Gwenny Penny. Thank you so much Gwen!

I love that it rolls up for easy transportation, and the adorable pocket for utensils!

I’m also thinking about making one for a friend of ours. We are planning to invite them to dinner, and I would like to make a placemat for their daughter!
>I Made A Purse!
>The evolution of my blog stalking went something like this:
February 2010: Little man is born and I spend hours every day nursing him and reading about Susan‘s amazing journey from giving birth to running a marathon in 1 year. Her blog was recommended to me by a fellow runner on babyfit.com.
October 2010: I am introduced to the world of couponing. I find Hip 2 Save, The Grocery Game (not a blog, but a lifesaver for me), and possibly most importantly Thrifty Decor Chick. That was my jumping off point! For half a year I hopped around the world of decorating on a budget, meal planning, home organization, and crafting. I didn’t have the means to do anything (thank you Dave Ramsey for giving me self control), and so I bookmarked. I have page upon page of projects that I would love to try! Some involved sewing, some paitning, some building, some crafting… but they were all things that spoke to me.
April 2011: I discover sewing blogs. Oh-em-gee! My love! Where have you been all my life?! I also borrowed my sewing machine from a friend this month.
May 2011: Oh wait, that’s today.
So back in October, or near after, I came across Jaime’s gem of a tutorial for her bias tape bag. I bookmarked it, along with everything else, and went on my way.
Flash forward to this past weekend! For mother’s day, I received gift cards to spend at fabric stores and I was in heaven! This is my first time to have more than $5 to spend on fabric at any given time. A quick browse through my saved projects and I knew what I was making…


>May 1-8: Clothes and Accessories!
>


– I’ve purchased my fabric, so I just need to get started.
* Circus by M’Liss Big Top Acts on Blue Cotton Fabric
Future Projects:
I’m not sure what’s next for me. Obviously finishing up what I’ve been working on. Then I guess I’ll hit the bookmarks or blog-browse until something else catches my fancy. One thing I’m a little tempted by is a runner for our kitchen table. The only caveats are that the table is a hot mess, it’s covered in paper and boxes and what-have-you, and I’ve never had a decorated tablescape before. Still, I’m thinking I *could* do it. No fabric or color choices yet, but it’s an idea.
Other Goals:
*Run more regularly! I was so close to placing in my age group (29 seconds) in this last 5k. I think there’s no reason I couldn’t speed it up! I want to run more consistently and really push myself.
*Cook all the veggies we got from the co-op this month. We got a ton of summer squash and zucchini and some bell pepper. I need to cook like crazy this week to keep it all from spoiling!
>Mother’s Day Recap!
>
 Happy Mother’s Day Everyone! I hope you all had a great weekend!
The course itself was pretty boring. It was an out-and-back, but at least the road did curve. The worst part of the run was not the course itself, but a little interference by a construction crew. A little less than a mile in, there was a helecopter moving beams on a 4-5 story building right next to the course. When I got to it, it moved directly over the road. At this point I was running next to

 After the race we went out to visit my mom. She left for Florida Sunday morning, so we had our Mother’s day festivities a little early. Her gift this year was a bookmark I made. She was pretty impressed, and I’m hoping it’s not just because she’s my mom!

All in all it was a great weekend! Very relaxing and fun! I hope everyone else had a magical weekend as well!

>A Second Shirt and a Competition!
>

Guess what I did today! I made another shirt! This time I used the loevely Tie Top Tank tutorial from Nancy at Belle Epoque! It turned out a little big on me, so I took some of the same ribbon I used for the top, and used it as a belt. I love how it turned out! It’s super comfy and very light for spring!

I’ve been reading a lot about The Spring Top Sewalong (direct link in button below) over at Made By Rae. I just uploaded my picture so we’ll see how it goes! I’m super excited about getting involved! I doubt I’ll win, seeing as this is only the 2nd shirt I’ve ever made, but I am just happy to have something I think is worthy of being thrown in the mix! So let me take a second to selfishly endorse myself… VOTE FOR ME! Ok, now that’s over with, I hope everyone has a great weekend and a happy Mother’s Day!


>So exciting! – A Shirt Brag Post
>

I wore my shirt to work today. I wore it tucked in to a skirt I rarely wear. And paired them with a new (to me) pair of kitten heels. The look is much more stylish than what I typically wear, mostly because the skirt is tucked in and sits at my belly button. I’m more of a safe, sit-on-the-hips kind of girl. But it’s been fun to dress up today. I have gotten a lot of compliments. Most of them are on the skirt, but two people stopped me to say how great my outfit was in general. How exciting!? I rarely get complimented like that for what I wear, and to get compliments that encompass my entire outfit, including the shirt I made, is just amazing. I was so scared to put myself out there this morning. I didn’t want to tell anyone I made the shirt. I was a little withdrawn and standoff-ish when I first got to work (I’m sure because I was uncomfortable). I was very guarded and scared. I’m an accountant. I’m not known as a creative person. But to put a creation of mine out there, and to have it accepted, and even praised… it’s amazing.
I’m sorry for the post without a picture, but I’m playing “single mom” tonight while my dear husband works late, and I just won’t be able to get a good shot. I will try to remember to recreate this outfit when my love is home to take the picture for me… maybe on Sunday… what better Mother’s Day gift to myself than to wear a shirt I made for myself?!
Sounds like a plan!
***I want to take a second, once again, to thank Kellyfor the amazing tutorial! And to thank all of the creative sewing blogs I’ve so recently come to love, for helping me build up the courage to try!***
>I made a skirt!
>

I know! I know! I still don’t have the link for this tutorial… but I MADE A SKIRT! The waistband is knit. It’s a yoga-style and folds down. The skirt itself is a woven cotton fabric. I need to do some cleanup on it. The stitch I used to make the ruffle can be seen in some places. I also have not hemmed the bottom yet. But it was a very exciting way to kill time before the Mavericks game last night! Thank you so much Ashley of Make It and Love It for the great tutorials!
On a side note… I think all major sporting events should be done on central time. I couldn’t stay up for the whole game last night because it started at 9:30pm, and I’m in Texas. I can’t even imagine if I was on the East coast. 11:30pm start?! If we move all start times to a reasonable hour in central time, nobody will have games “too early” or “too late.” It would also be convenient for me – which is probably the most important reason.


>April 24-30: Shirt, Tie, and a Pillow or Two
>Completed This Week (April 24-30):


Current Projects:
black knit tank w/ ruffle flower
– finish sleeves
– even out neck line
– fix shoulders
– hand-wash
– wear to work and/or church
Future Projects:
tie-top tank
yoga skirt with knit waisteband
out-to-eat placemat for the little man
shirt with my pattern
– need to buy straight pins
Other Goals:
May 6th – Mom Run 5k
>DIY – Ballard Designs Inspiration
>
Morning loves! I have been wanting to do a DIY tutorial for a long time… in fact, I’ve been wanting to DIY for a long time… but I confess I’ve been scared. I’m a perfectionist, you see. So I want things to be perfect. I also tend to be a bit hard on my self so the conversation goes something like this.
Me #1: Ooo! I can be crafty! I can make something for my home!
Me #2: No you can’t! It won’t be good enough!
Me #1: Yea, you’re right…
And that’s the end of it. But yesterday afternoon I told Me #2 to take a hike! I was killing some time at Michael’s and I decided to finally make the Ballard Designs inspired artwork that was one of the very first blog posts I ever read.


I didn’t have the blog on me, and didn’t think of looking it up on my phone, so I just winged it (is that right? winged? wang? idk…). So I needed pretty paper, glue of some sort, and something square. Canvases were on sale so I got a set of 4. I got some Mod Podge and a brush too. I came home and told my husband all about the plan I was going to do “eventually.” He kinda gave me a funny look when I said I didn’t know what to do. See, he was reading Harry Potter… and I just finished the last one… so what am I supposed to do with my time? Those of you who are quick are thinking “yea but, you bought crafty stuff, you could… idk… craft?” but I had already forgotten about that! So anyway, with some helpful reminders from my husband I decided to go on my way. What started out as a covered canvas project became much different and actually much cheaper, as you’ll see below. This taught me a great lesson though, don’t avoid doing projects you see on other people’s blogs because it looks like something you can’t do. You may be right, but you’ll find a way to make it your own and will be all the happier for it!
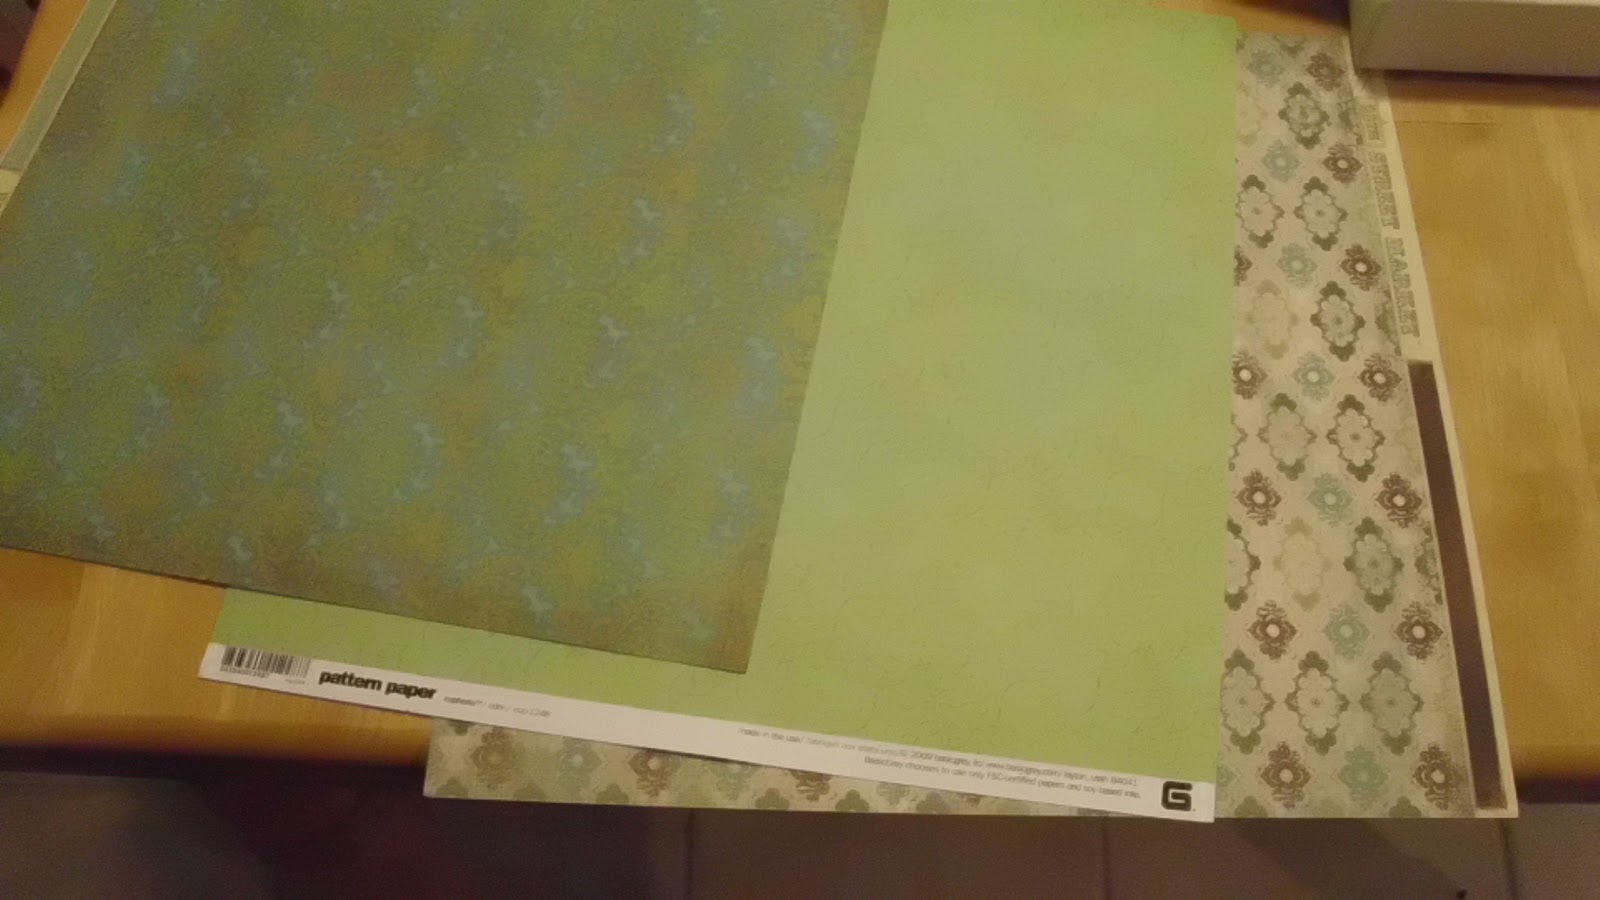
So here are all my pretty little supplies:


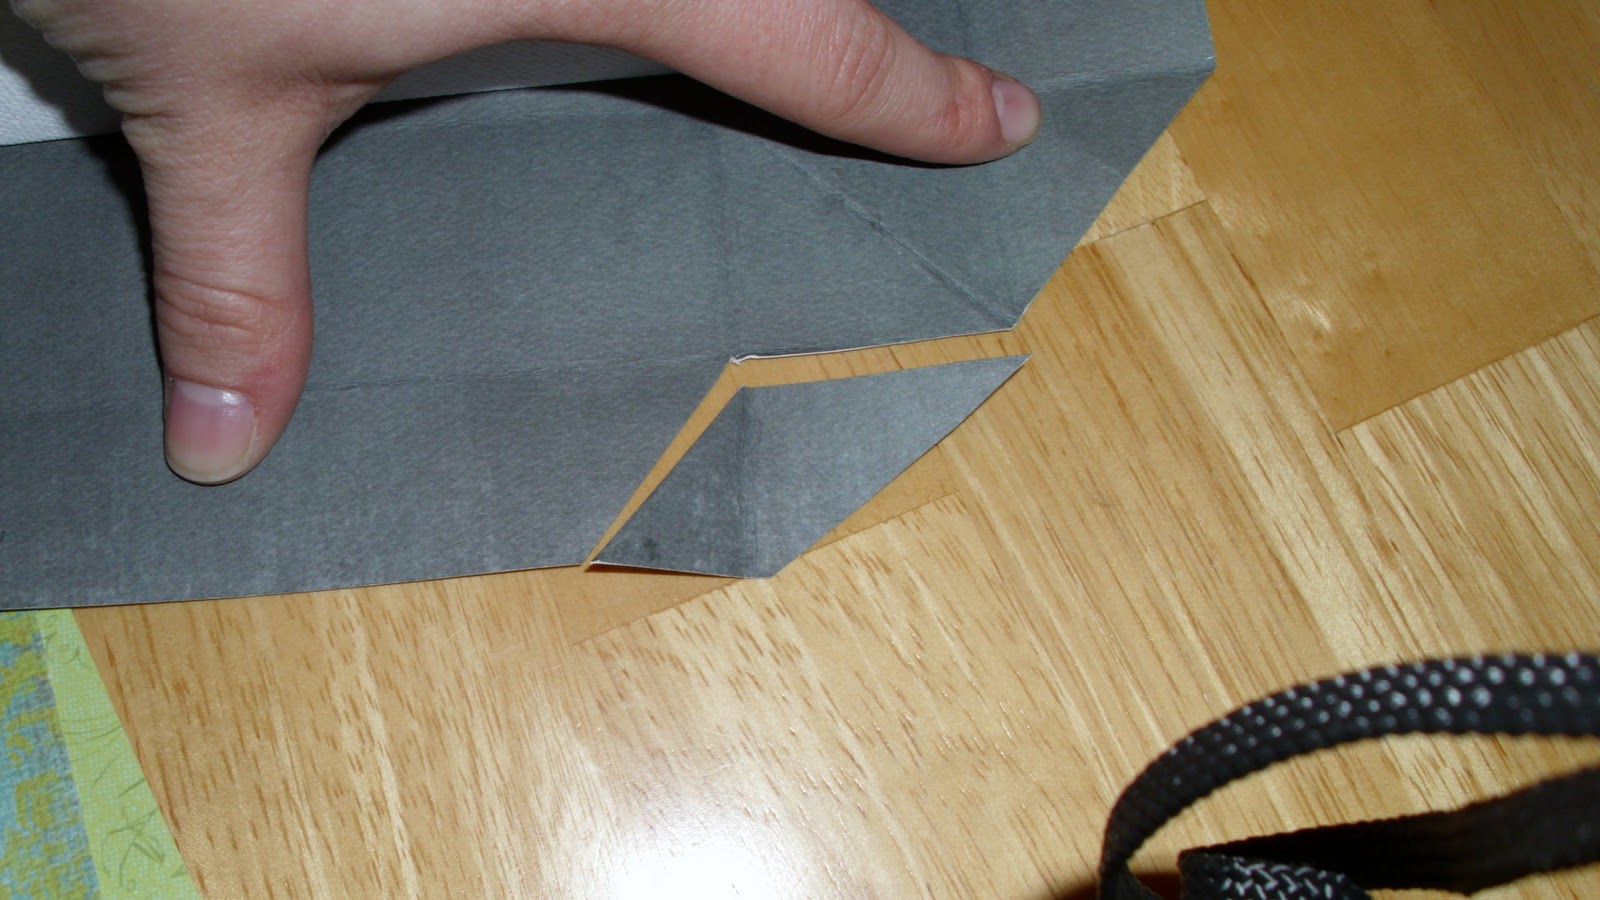
The first thing I did is begin to wrap my canvas like a present.

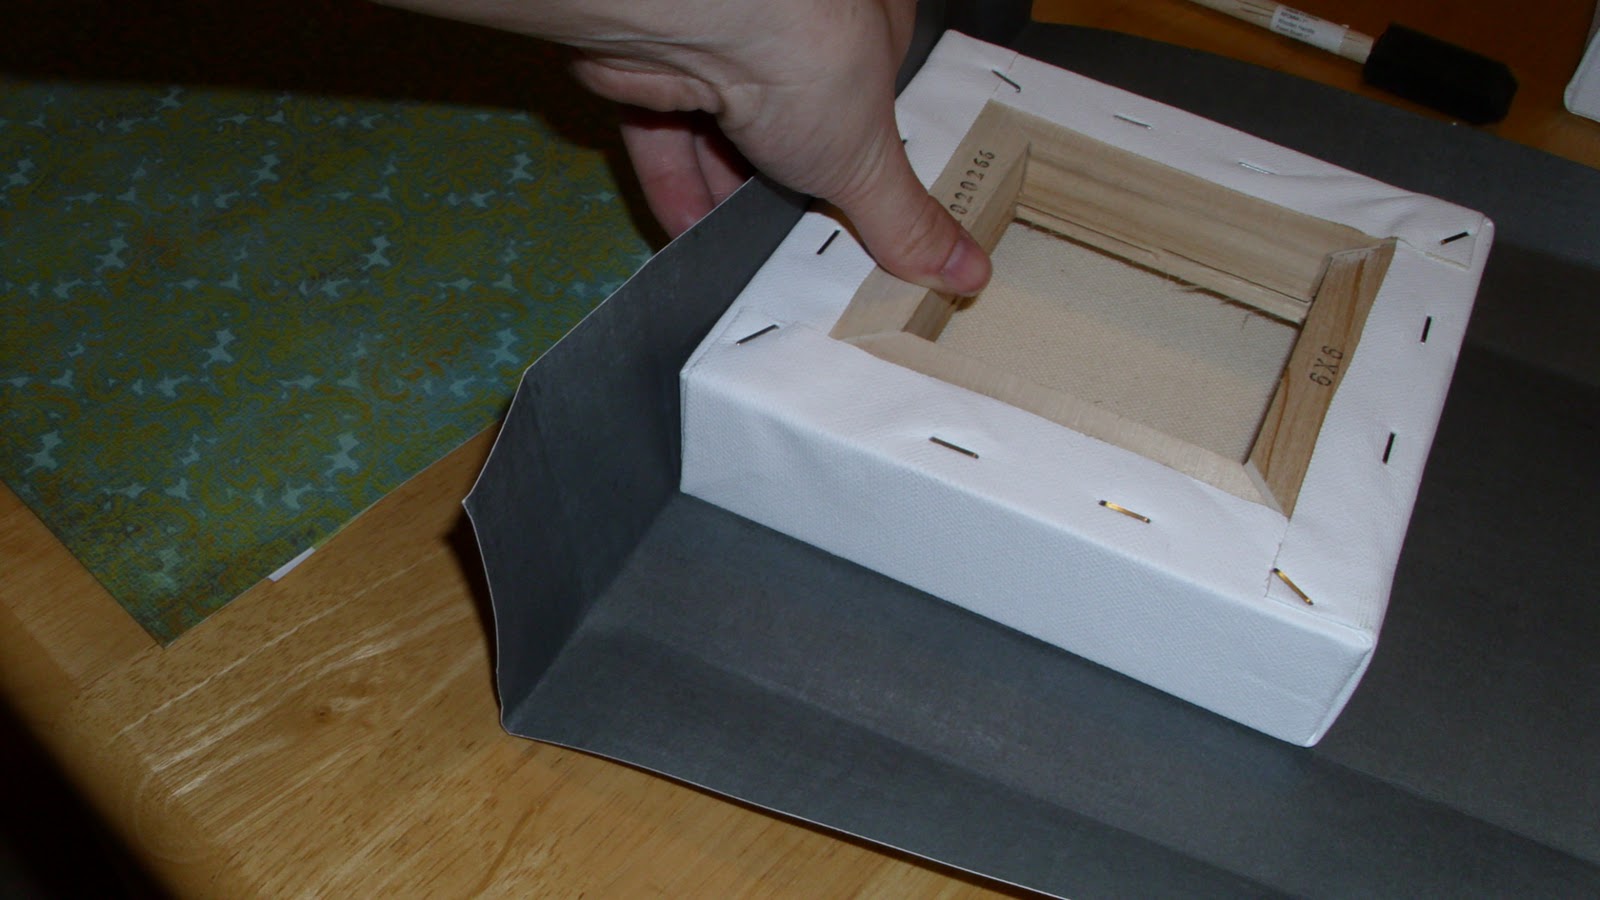
In order to make the corners smooth, I folded them out to get a 45% angle fold.

Then I laid it flat and cut off the top (to avoid a build up of excess paper making the corner bulky and harder to deal with)

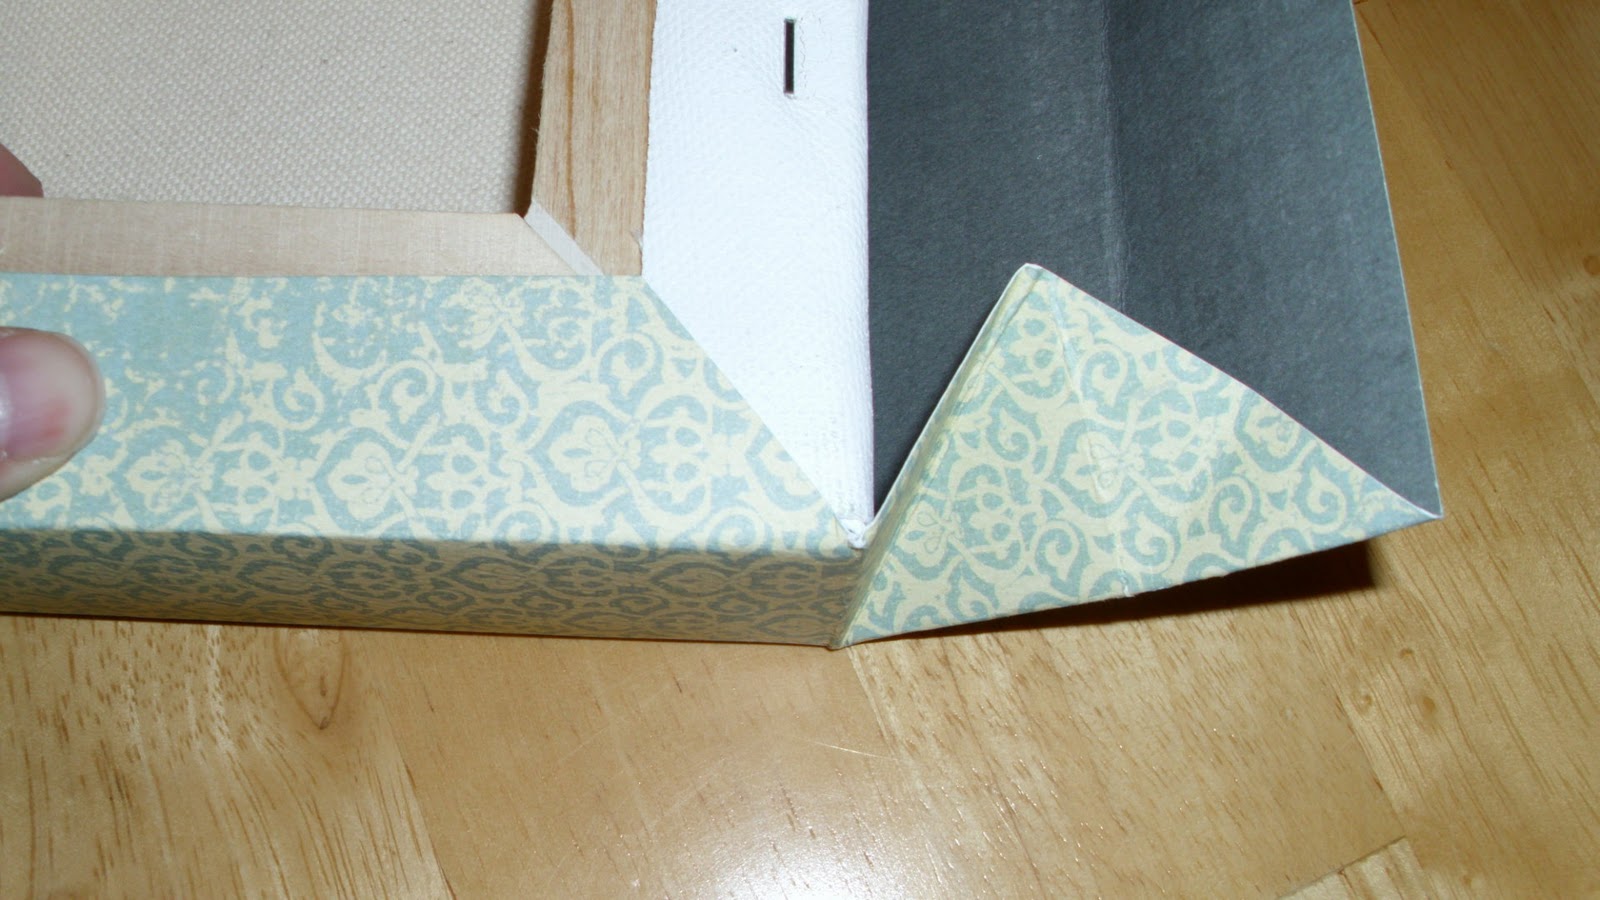
With all of the folds already in place, I wrapped the present right up. It’s important to get all of the folds in place before you wrap so that you can get crisp clean lines.

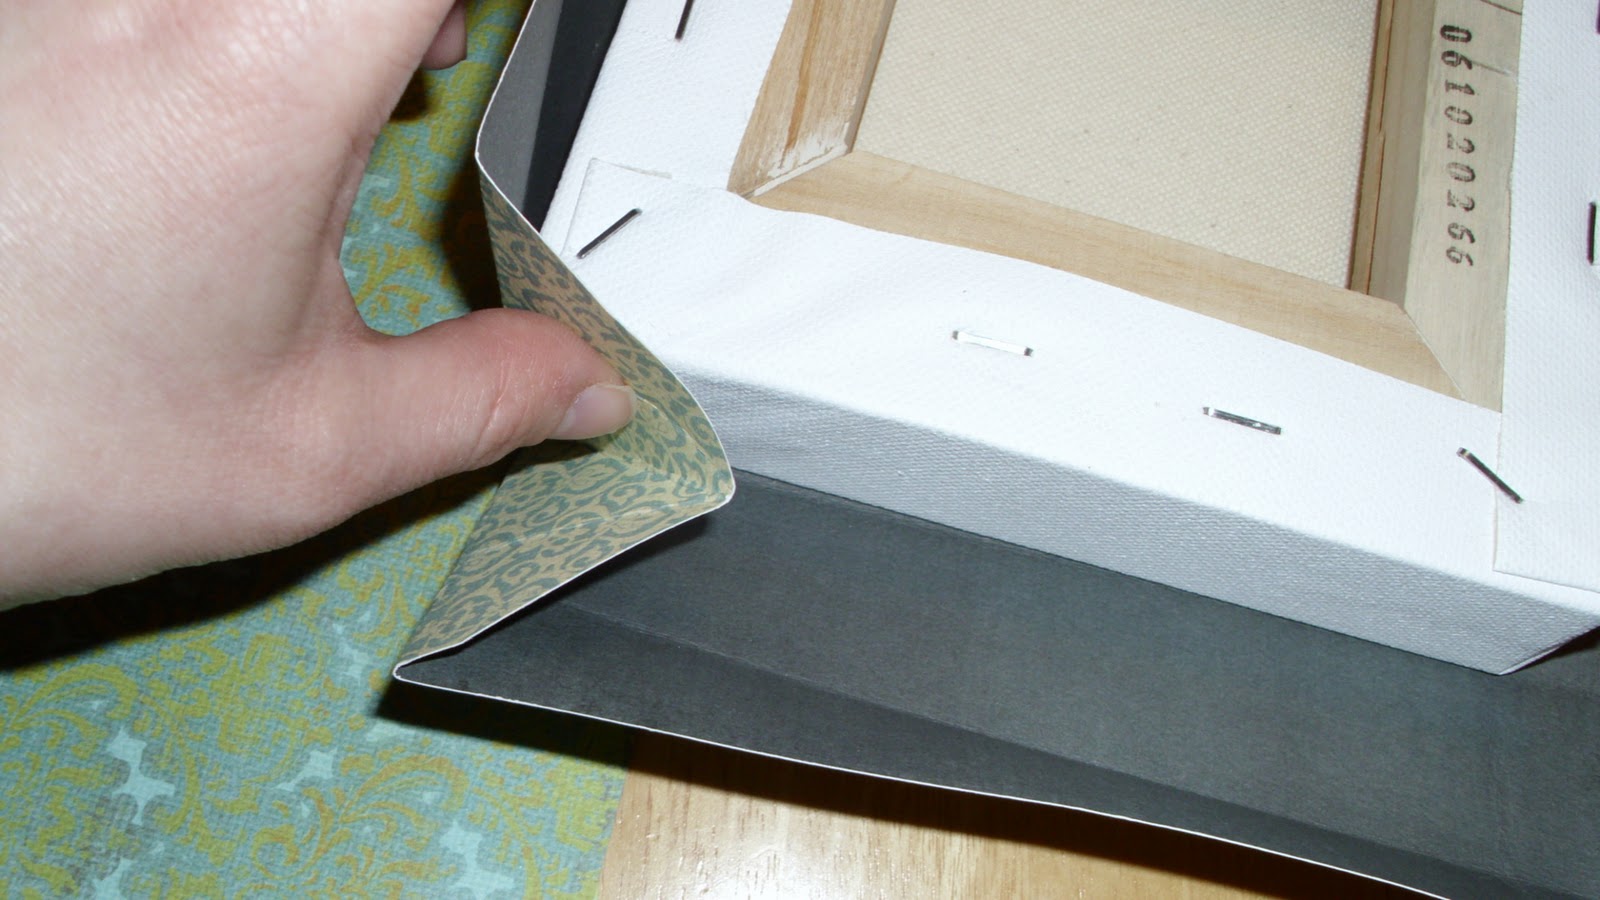

The finished corner should look like this.

At this point (I don’t have a picture), but it’s looking like a big box without a top on it. I still needed to fold down the paper that’s sticking straight up the back. When I did this it was very bulky again, so I made a few more cuts like so:
More wrapping.
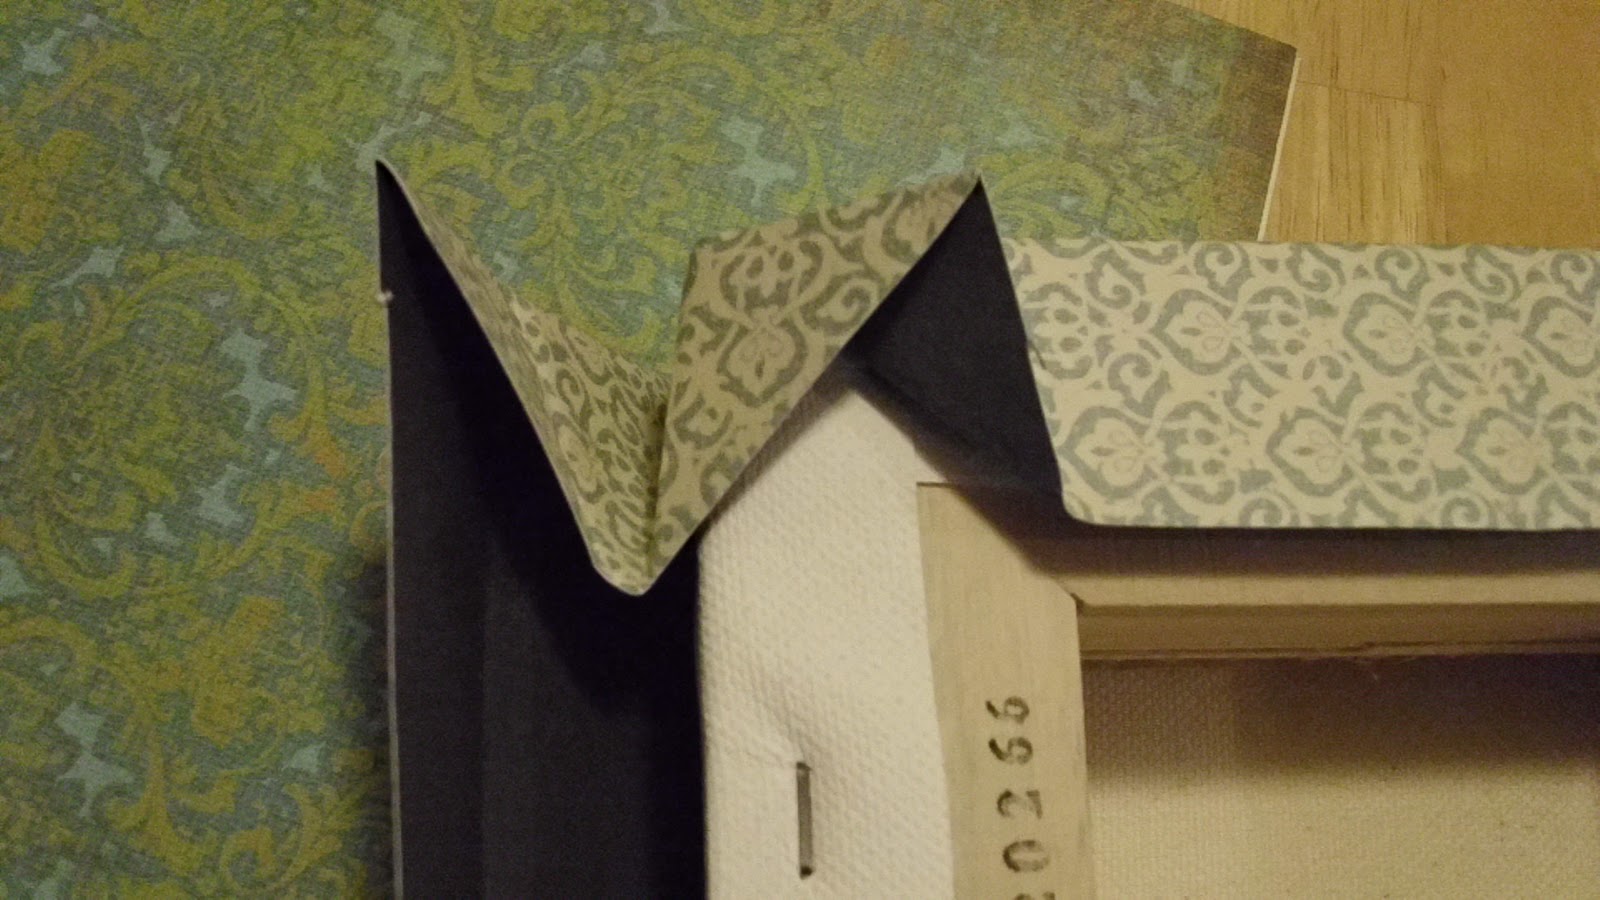
And the final back looked like this.

At this point, I realized that the paper was really holding up well on it’s own. I started to question whether I needed the canvases at all. After consulting with the boss man (my dear husband), we decided they were sturdy enough to live without canvases underneath. SCORE ONE FOR KRISTI! I now have 4 blank canvases for ANOTHER project! Woo hoo!
I unwrapped the canvas, pulled it out, and modgepodged my box together. We decided to go for a matte look, and since I had purchased semi-gloss modge podge I was very careful not to get any on the front or sides. If you purchased different modge podge or wanted a shinier look, you could always cover the whole thing, which would really save a lot of worrying about getting glue everywhere!
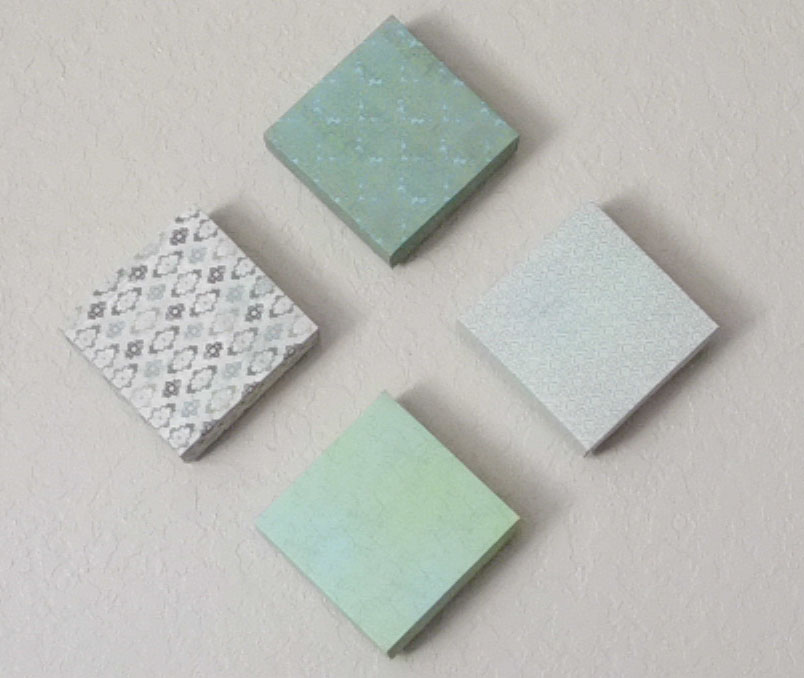
So here’s the final project!
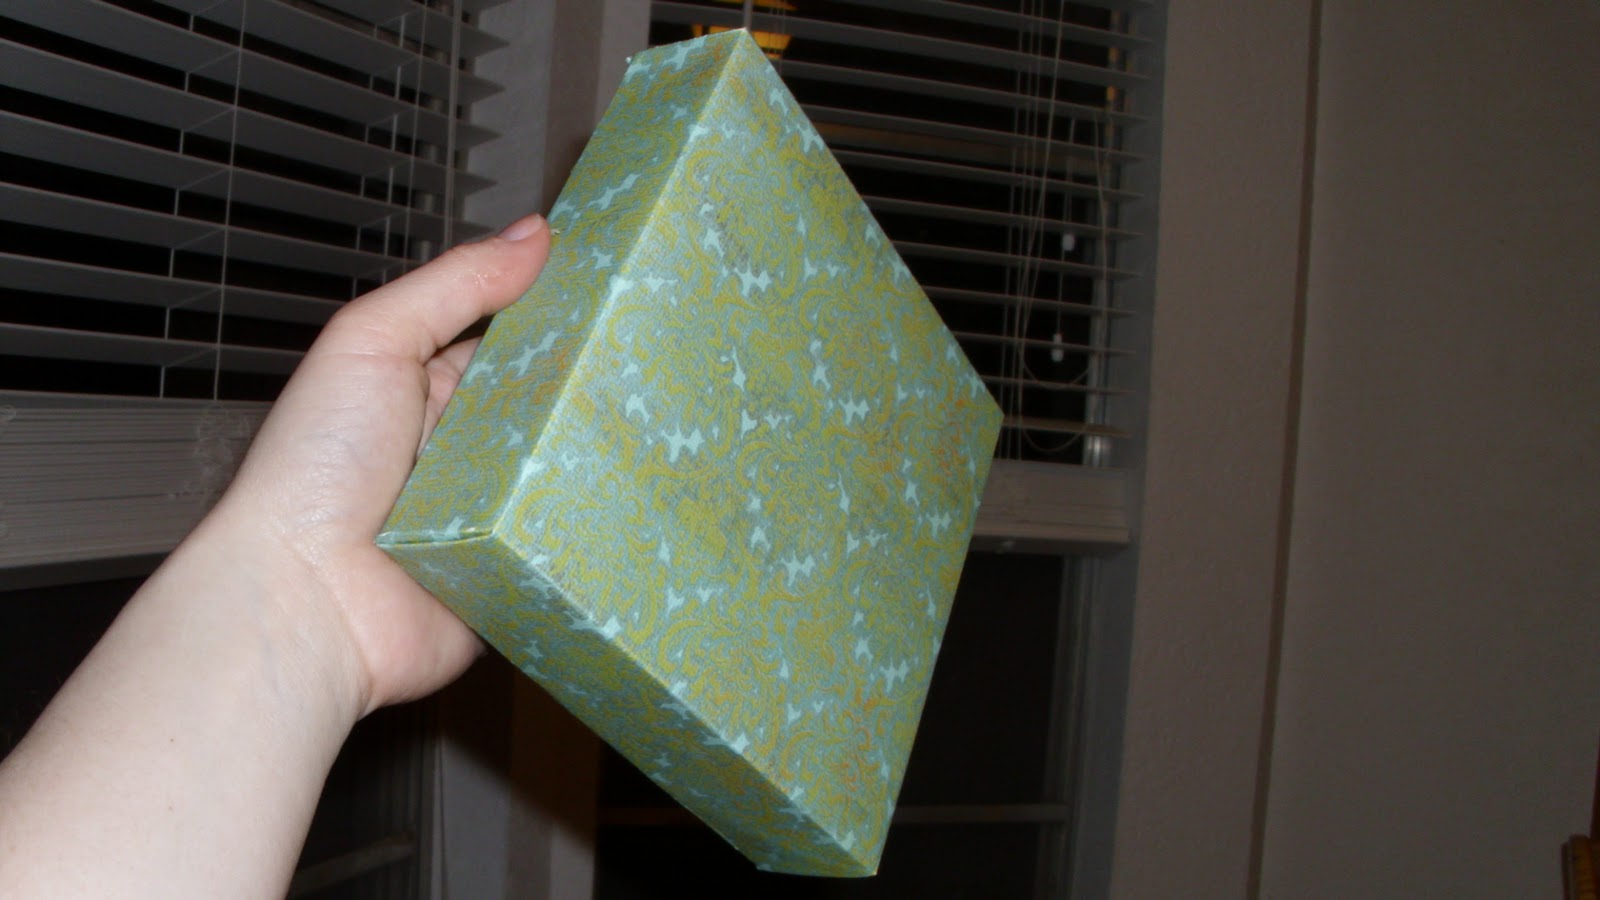
A beautiful wrapped canvas. And here’s a shot of my secret…

All empty!
And here’s the beauty on the wall! Yes, I know it’s a little empty, but little man went to take a nap and we can’t do any more hammering/hanging until he wakes up.
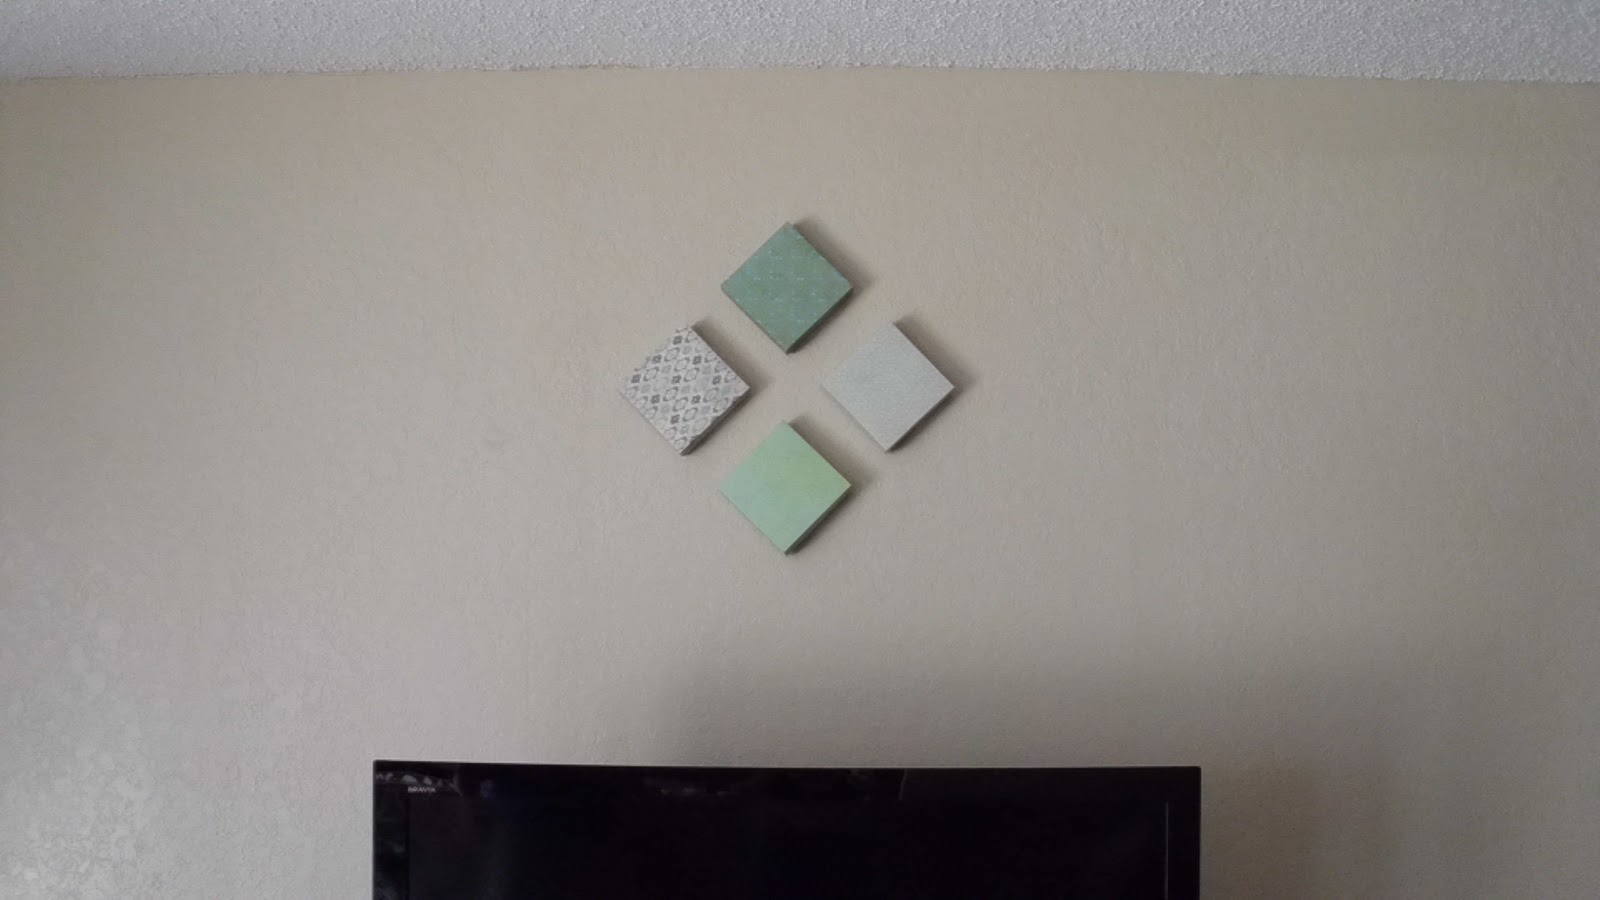
Final cost for this project $2.
The canvases were $12.99 (40% off… and I didn’t use them anyway).
The Mod Podge was $3.89 (I don’t count this because I barely used it at all).
The sponge brush was $0.39 (Also not counted since it will be reused).
The scrapbook paper was $2.00 (on sale 2/$1).
And it took about an hour!
Lessons I learned in my first DIY project…
1) Don’t be afraid… just try it!
2) You could make the boxes SOOO much easier if you had a silhouette machine! Oh wait! I do… except I’m too scared to try it (see lesson #1)!
And finally a HUGE THANK YOU to Sarah at Thrifty Decor Chick for the inspiration and for really getting me in to DIY design in the first place!
I linked up!


